

The Problem
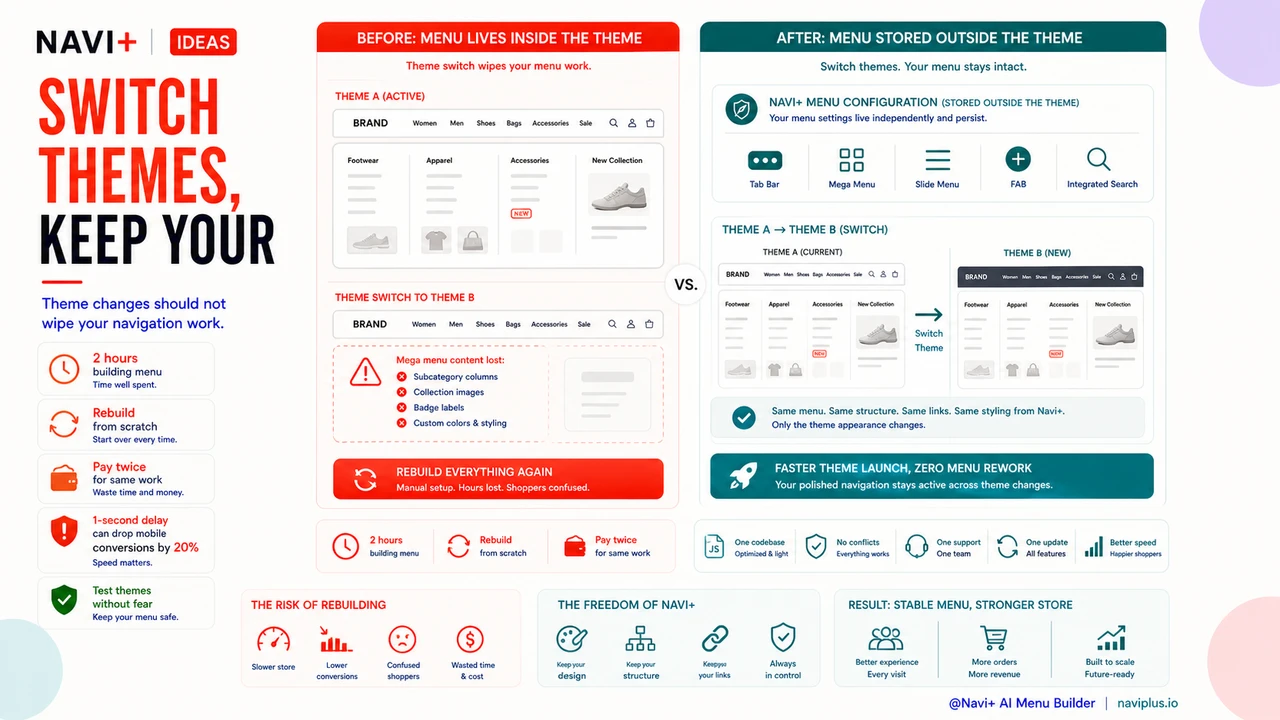
You spent two hours in the Shopify theme editor building your mega menu. Subcategory columns arranged just right. Collection images pulled in as thumbnail links. A "Sale" badge styled in red next to the relevant category. Custom colors that match your brand. Then your designer finds a faster theme — one with better mobile performance and a cleaner layout — and you switch. Within seconds, the new theme loads its own default navigation. Your entire configuration is gone. Not archived somewhere. Gone.
This is not a fringe scenario. Shopify and WordPress themes each have their own navigation system. Settings, styling rules, and custom menu structures are stored inside the theme, not in some neutral shared location. When the theme goes, those settings go with it. So every time you redesign, upgrade to a theme that supports a new feature, or even just want to test a different template on your staging environment, you're looking at rebuilding your navigation from scratch — or paying someone to do it again.
The compounding effect is real: store owners who have been burned by this once start avoiding theme changes altogether. They stick with a slow, dated theme because the cost of switching — in time, money, and the anxiety of "what will break?" — feels too high. Meanwhile, competitors on faster, better-optimized themes are loading in half the time and converting at higher rates. The menu is holding the whole store hostage.
"I had everything exactly how I wanted it — images, categories, custom colors — took me most of a day. Then I switched to a faster theme and it just wiped everything. I had to rebuild the whole thing. After that I told myself I'm never changing themes again, which is a terrible way to run a store."
— A Navi+ customer
Theme-locked navigation costs more than you think
The obvious cost is the rebuild time — and if you hired someone, the invoice. But the less visible cost is the decisions you never make. How many times have you looked at a new theme and thought "I'd love that, but I can't face redoing the menu"? That hesitation is real, and it has real consequences:
- You stay on a slower theme — and page speed is a direct ranking and conversion factor. A one-second delay in load time can drop mobile conversions by 20%.
- You miss the Shopify feature you actually wanted — newer themes often support native features (like metafield display or new section types) that older ones do not, but you avoid upgrading because of the navigation rebuild risk.
- You pay twice for the same work — the first developer who configured your menu, and the second one who reconfigures it after you switch.
- You can't test themes before committing — without a way to preview a new theme while keeping your production menu intact, you're flying blind. You switch and hope, rather than switch and verify.
- Team velocity drops — every time navigation changes require a developer review before a theme update can go out, the pace of your whole store slows down.
None of these costs show up on a single line item. But they accumulate over the lifespan of a store and represent real money and real opportunity left on the table.
How Navi+ AI Menu Builder solves this
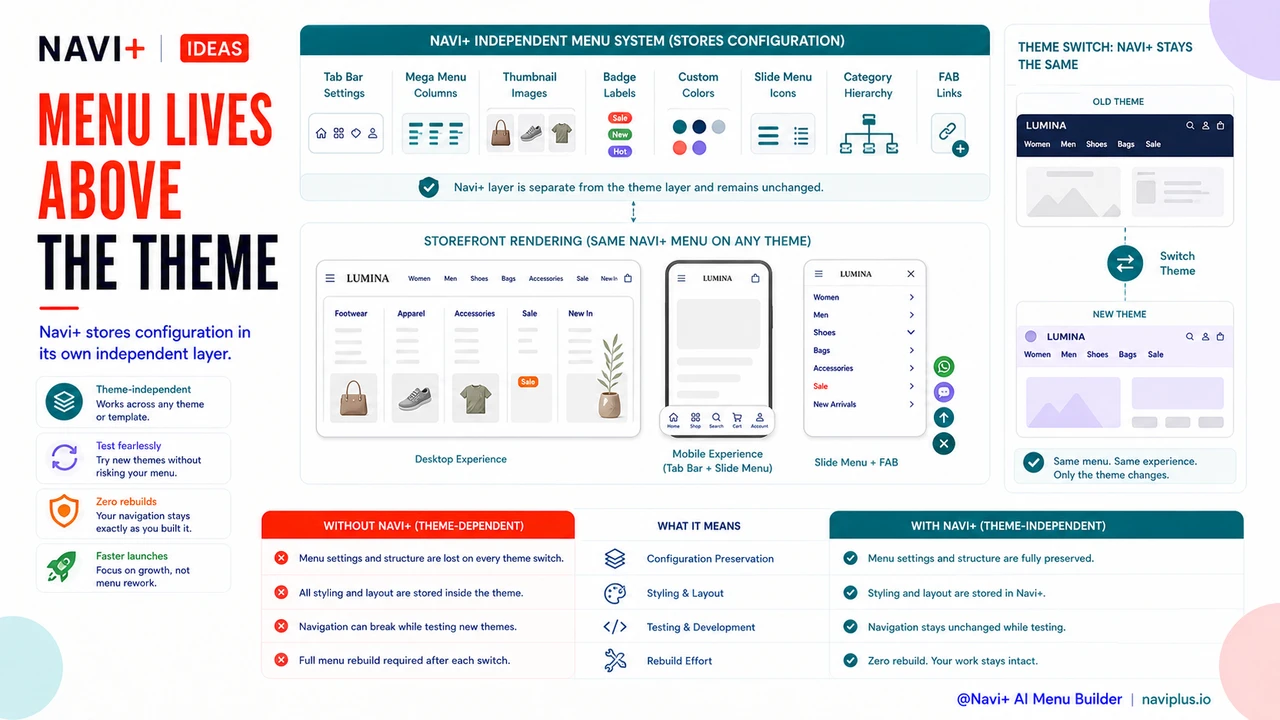
Navi+ AI Menu Builder stores your entire menu configuration in its own independent system — not inside your Shopify theme or WordPress template. The menu renders through Navi+'s own code, injected into your storefront independently of whichever theme is active underneath. This is the architectural difference that changes everything.
When you switch themes, Navi+ is unaffected. Your Tab Bar stays exactly as configured. Your Mega Menu columns, thumbnail images, badge labels, and custom color overrides are all still there. Your Slide Menu with its custom icon set and category hierarchy is intact. You do not lose a single setting, because none of those settings live in the theme that just changed.
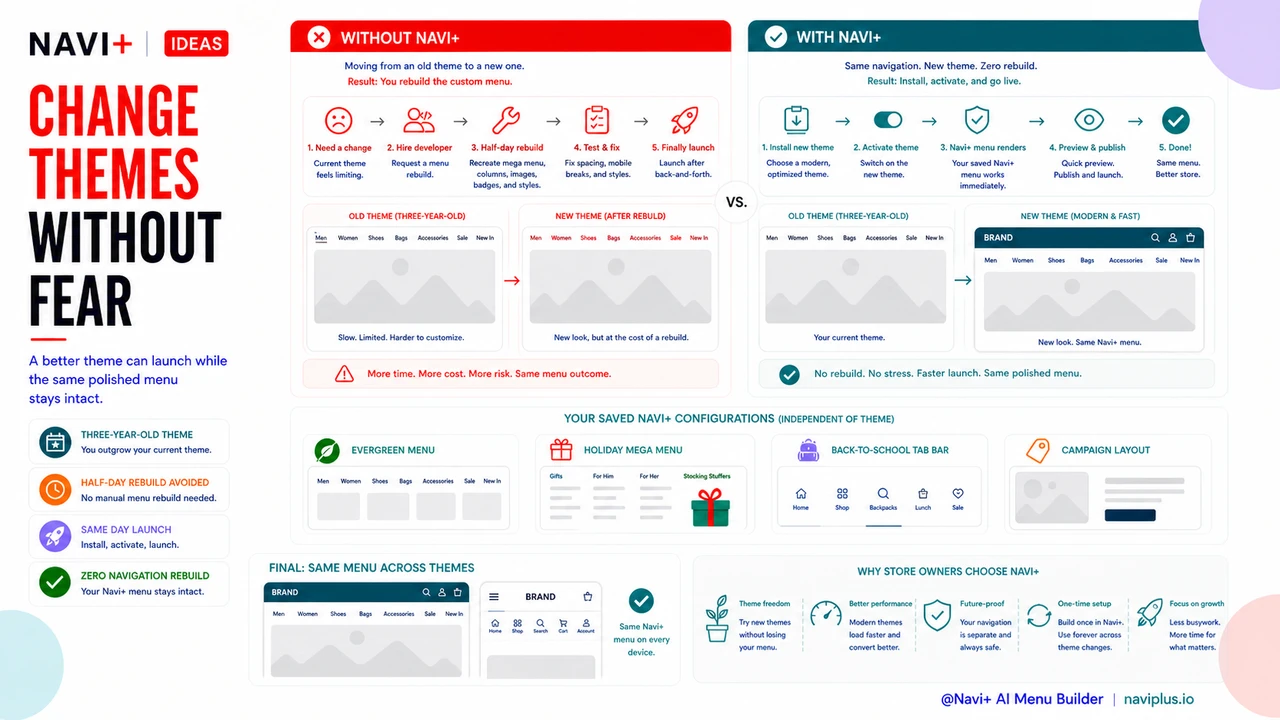
In practice, this means you can test a new theme on your live store in the morning, decide it is not right, revert by afternoon, and your navigation never skipped a beat. You can upgrade from a legacy theme to a performance-optimized 2.0 theme and go live the same day — without a developer, without a rebuild, and without the anxiety of "what did I break?" The menu is simply there, regardless of what the theme layer is doing.
The setup is a one-time investment. You open the Navi+ editor, build your navigation using drag-and-drop — choosing from Tab Bar, Mega Menu, Slide Menu, or Floating Action Button layouts — configure the styling, and save. From that point forward, the menu is yours permanently, theme-independent and always editable without touching a line of code.
Without Navi+ vs. With Navi+ AI Menu Builder
| Feature | Default / Without Navi+ | With Navi+ AI Menu Builder |
|---|---|---|
| Menu survives a theme switch | ✗ Lost on every switch | ✓ Fully preserved, always |
| Custom styling (colors, badges, images) | ✗ Stored in theme — gone with it | ✓ Stored in Navi+ — theme-independent |
| Test a new theme without risk | ✗ Navigation breaks during testing | ✓ Menu unchanged while you test any theme |
| Rebuild cost when switching themes | ✗ Full rebuild every time | ✓ Zero rebuild — menu stays as-is |
| Developer required to maintain menu | ✗ Yes, for any theme-related update | ✓ No — self-service, drag-and-drop editor |
| Menu layout options | ✗ Whatever the theme provides | ✓ Tab Bar, Mega Menu, Slide Menu, FAB |
What you get
The immediate benefit is obvious: switch themes without fear. But the deeper benefit is the freedom to keep your store's design current. Themes improve every year. New versions offer better performance, native feature support, and cleaner mobile layouts. With Navi+, you can always take the better theme when it is available — because the cost of switching just dropped to zero for your navigation.
Here is what the workflow looks like in practice: A store owner wants to move from a three-year-old Shopify theme to a newer Dawn-based template for better Core Web Vitals scores. Normally this is a half-day project involving a developer to rebuild the custom mega menu. With Navi+, the process is: install the new theme, activate it, confirm the Navi+ menu is rendering correctly (it will be), done. The menu was already there.
One practical tip: use the Navi+ editor to create separate saved configurations for different seasons or campaigns — a holiday version of your mega menu, a back-to-school Tab Bar layout, a standard evergreen configuration. Because the menu lives in Navi+ and not in your theme, you can switch between these saved layouts any time, independent of any theme changes happening elsewhere in your store.
Try it free — no code, no developer needed
Install in minutes on Shopify, WordPress, or any website.