

The Problem
Walk into a clothing store where all the racks are unlabeled. You can read a small sign that says "Women's SS25" or "Collection A" — but you cannot tell from the sign alone whether that rack holds what you are looking for. You guess, walk over, feel the fabric, and realize it is the wrong section. You walk back, try another. That is exactly what text-only navigation does to online shoppers, every single day.
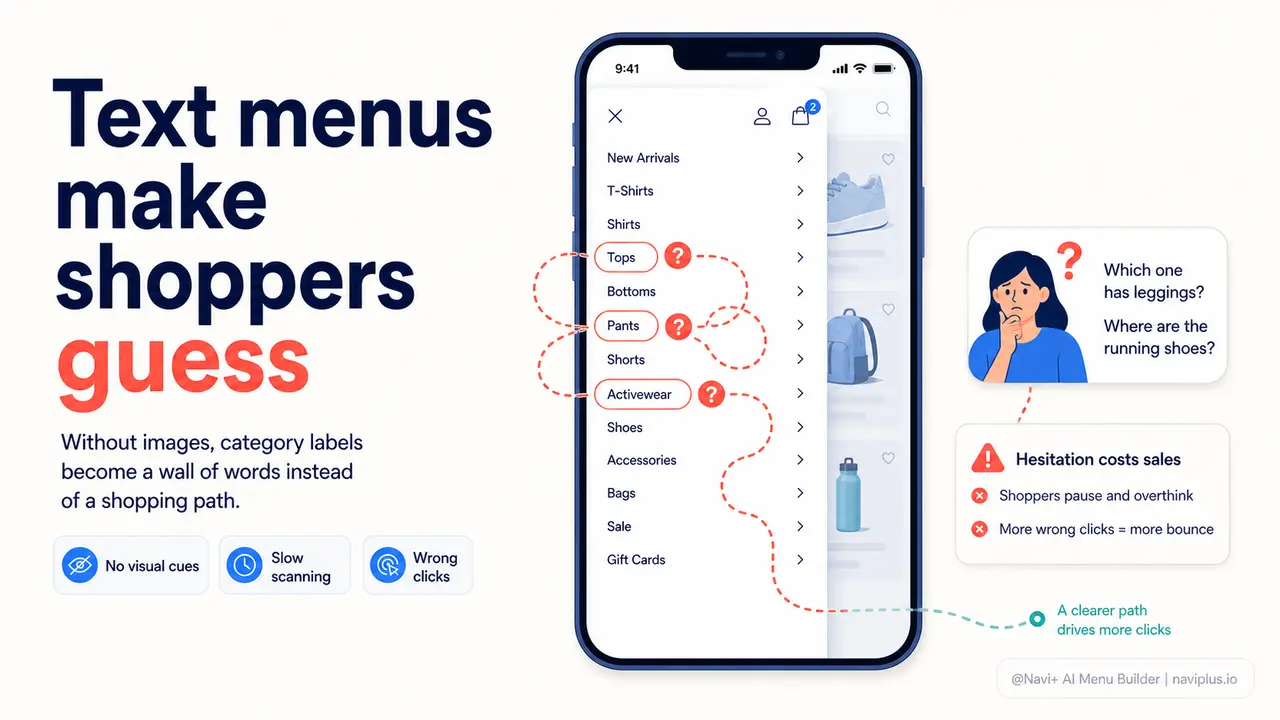
Most store themes give you a flat list of category names in the menu. Those names make sense to you because you built the store and know every product in it. To a first-time visitor, "Accessories," "Lifestyle," and "Essentials" are nearly identical signals. They open the menu, scan a wall of words, feel uncertain, pick the option that sounds closest, and land on the wrong page. Then they tap back. Maybe they try again. More often, they close the tab.
The cost of this friction is invisible on most analytics dashboards, but it is real. Every visitor who bounces from a category page they did not intend to land on is a visit that failed at navigation — not at product selection, not at price, not at trust. They never got far enough to evaluate the product. The menu sent them to the wrong room, and they left the building.
"I had 'Rings,' 'Necklaces,' and 'Bracelets' in my menu. People kept landing on the wrong category and bouncing back. When I added a small product image next to each label, the back-and-forth just stopped. They knew exactly where they were going before they tapped."
— A Navi+ customer
Visual recognition matters more than you think
The human brain processes images roughly 60,000 times faster than text. When a shopper opens a menu and sees a photograph of a leather wallet beside the word "Wallets," there is no cognitive gap — the image confirms the label in an instant. When they see only the word "Accessories," they must mentally decode whether that category contains what they want. That extra half-second of hesitation, multiplied across every menu interaction, is where conversion quietly erodes.
Here is what actually happens when your menu is text-only and your categories are not immediately obvious:
- Pogo-sticking: Visitors click into a category, scan for two seconds, click back, repeat. Each round trip adds frustration and signals poor UX to the visitor.
- Wrong-category exits: Visitors land on a category page expecting one product type and find another. If the page load takes more than two seconds, many leave before they even see they were wrong.
- Lost cross-sell opportunities: A visitor looking for shoes who cannot easily spot the "Bags" category in a wall of text will never discover it. A visible bag thumbnail in the menu would have caught their eye.
- Lower session depth: When navigation feels uncertain, visitors explore less. They stick to the one path they feel confident about — or they leave.
- Ad spend waste: If you are running paid traffic to your store, every visitor who bounces because navigation confused them is ad spend that produced zero revenue.
The fix is not to rename your categories. The fix is to let visitors see what is inside before they commit to a tap.
How Navi+ AI Menu Builder solves this
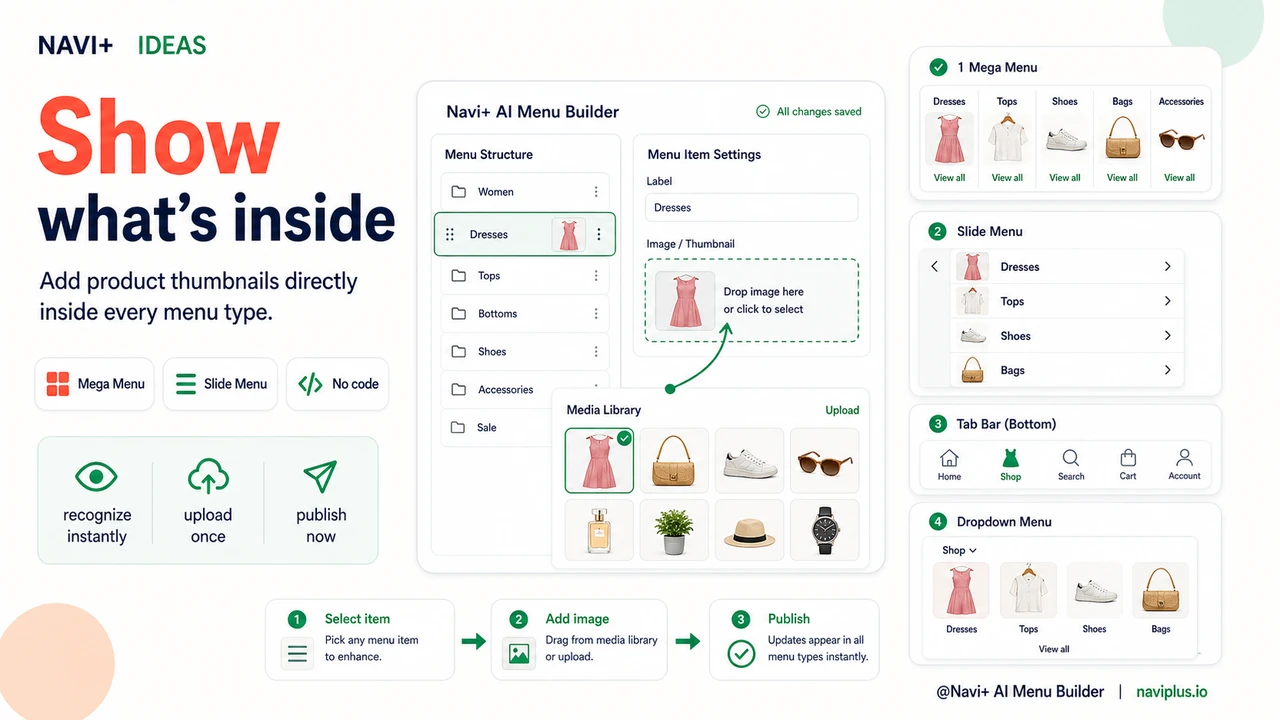
Navi+ AI Menu Builder lets you attach images to individual menu items across every menu type it supports — Mega Menu, Slide Menu, Tab Bar, and dropdown menus. The images appear directly inside the navigation, visible the moment a visitor opens or hovers over the menu, before any category page loads.
In the Mega Menu, you can display a small thumbnail image beside each category name in a column. Visitors see "Rings" with a photo of a stacked ring set, "Necklaces" with a layered pendant image, "Bracelets" with a charm bracelet close-up. No guessing. The image does in 200 milliseconds what a category page title does in two seconds of reading.
The setup process is straightforward. In the Navi+ dashboard, open your menu in the drag-and-drop builder, select a menu item, and upload or choose an image from your store's media library. Set the display size — small thumbnail or full-width block — and save. No code, no CSS, no developer ticket. Changes publish immediately. If you update a product line seasonally, you update the image in the menu in the same way you would update a product photo.
For stores with a large catalog, you can also use images to visually separate sub-categories that share a parent. Under a "Women's" top-level item, sub-categories like "Tops," "Dresses," and "Outerwear" look identical as text. With images, each becomes immediately distinct — even at a glance on a 375px mobile screen.
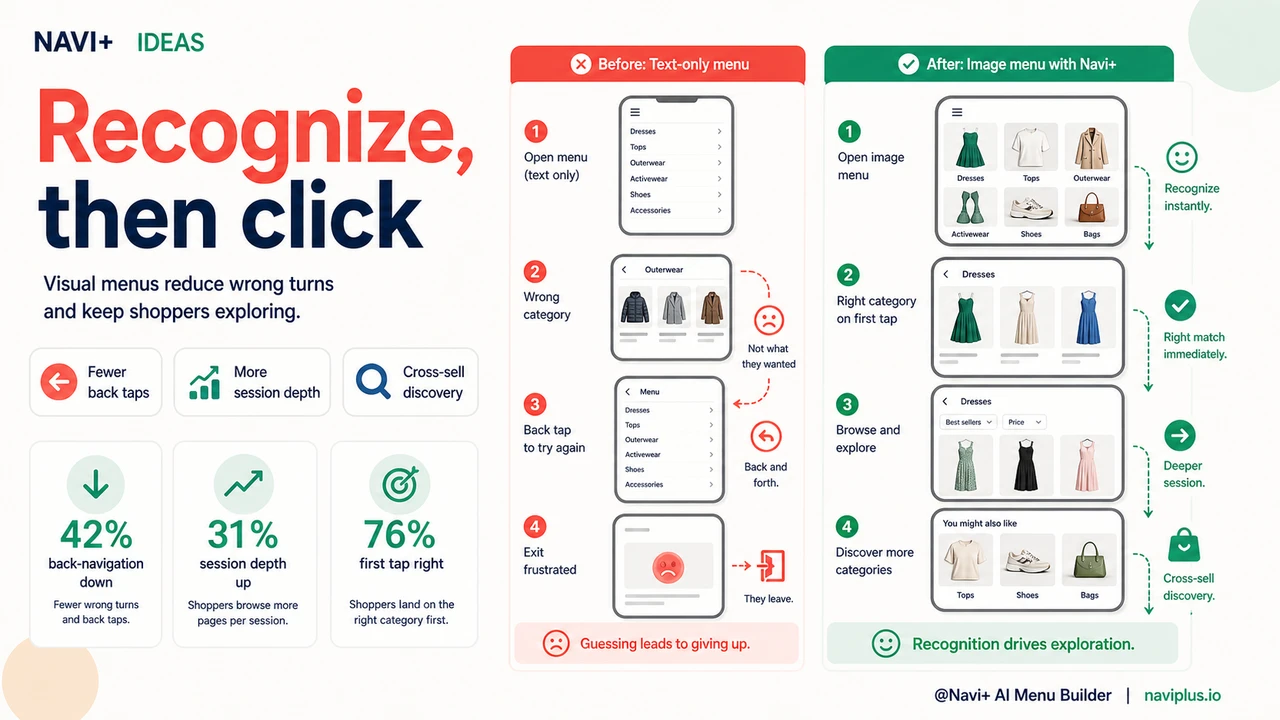
Text-only menu vs. image-enabled menu
| Feature | Default / Without Navi+ | With Navi+ AI Menu Builder |
|---|---|---|
| Category recognition speed | ✗ Read label, decode meaning, decide | ✓ See image, recognize instantly, tap |
| Sub-category differentiation | ✗ All links look the same — text only | ✓ Each sub-category has a distinct visual |
| Wrong-category navigation | ✗ Common — visitors guess and bounce back | ✓ Rare — image confirms before the tap |
| Cross-category discovery | ✗ Visitors only explore what they searched for | ✓ Thumbnail catches the eye of adjacent interest |
| Image management | ✗ Not possible without custom code | ✓ Upload or select from media library, no code |
| Works on mobile | ✗ Text menus collapse to hamburger, no images | ✓ Images render in Slide Menu and Tab Bar on mobile |
What you get
After switching to image-enabled navigation, the most immediate change most store owners notice is a drop in back-navigation events. Visitors stop bouncing between categories because they land in the right place on the first tap. Session depth improves — not because visitors are browsing more aggressively, but because navigation is no longer an obstacle.
To get started, identify the three to five categories where your visitors most commonly land on the wrong page. These are typically the categories with similar or ambiguous names — "New Arrivals" versus "Best Sellers," "Knitwear" versus "Outerwear," any parent category with multiple similar sub-categories. Add a representative product image to each of those menu items first. Measure the difference in bounce rate and session depth over two weeks. Then extend images to the rest of your navigation.
A practical tip: use product photography you already have rather than creating new assets. A clean product-on-white image at 200x200px works well in most menu layouts. The goal is immediate recognition, not editorial beauty. If the visitor can see "this is a shoe" at a glance, the image is doing its job.
Try it free — no code, no developer needed
Install in minutes on Shopify, WordPress, or any website.